Monday, February 27, 2012

QOV Finish

The Quilts of Valor project made by The Quilt Block Ladies is finally finished.

I'm pleased with the end result and learned several things by using a new (to me) quilt as you go technique.
1.  The stitch-and-flip technique to piece and quilt at the same time was quick and satisfying.
2.  The blocks that I made using the regular foot did cup somewhat compared to those made with the walking foot, but it's not noticeable in the final product.
3.  I should have checked the backs of my pieces when cutting and putting them together - I had about 6 sections where the batting was showing (1/8") and I had to do some hand darning to fix.
4.  I forgot to mention in the joining of the blocks post, that I did trim the blocks after they were joined to keep everything square.  The top stitching flattened the batting and not trimming would have created volcano-shaped bulges.

5.  The binding strips that joined the blocks helped to disguise that the diagonal strips weren't always perfectly centered or had slight variations in width (an artifact of having them sewn by 12 different people on different machines.)

6.  No matter how hard I tried, I never seemed to get the blocks absolutely lined up.

7.  The top stitching technique looks great on the front, but leaves some random looking seams on the back.  Although I'd like a "cleaner" look on the back,  it took only 2 days to join and bind 42 blocks this way, compared to 3 days for 20 squares on my yellow string quilt using the hand stitch option.

I've also been working on the handquilting for the Double Wedding Ring.  After much debate and many suggestions, I decided to add only one more round of stitching on the center.  It's about 5/8" from the other.

I really like the way that hand-stitched lines that far apart create a nice texture when they are washed.  Hopefully the bamboo batting will behave like I'm hoping (it's only my second time using it).

Monday, February 20, 2012

Joining Prequilted Panels

As the "A Team" used to say...I love it when a plan comes together.  

The Quilt Block Ladies came to our February meeting with over 20 more finished blocks.  I used the returned scraps and strips to finish up for a total of 42 blocks.

Leah Day recently posted a video tutorial of the technique that I used to put together the yellow string quilt that I made like this.


I made one change to this standard approach and I am very pleased with the results!  Basically, I did it backwards.  I cut the 1" wide strip of the backing fabric.

And I cut the 1.5" strip of the front binding fabric and pressed it in half, wrong sides together.  The light blue backing strip and dark blue binding strip are sewn on to the square at the same time.

Then the second block is attached to the other raw edge of the light blue backing strip.

The blocks then butt together with the two 1/4" seam allowances filling the 1/2" binding strip piece.  In the traditional approach this folded edge piece would be on the back and be hand stitched into place.

But instead, I top-stitched this in place right on the edge.

Then I top-stitched the other side of the binding piece also.

The top stitching looks nice and tidy on the top, and the back doesn't look too bad.

Now I'm joining pairs, then making 4 square sections then finally into 3 long strips for the final joining.


Tuesday, February 14, 2012

FMQ Practice

I've been doodling and trying ideas for FMQ.  This is one of the leaf patterns from the Ojibwe Inspired Applique 

I'm very pleased with the fill, but the stippling that I used distracts from the interesting fill for the leaf.  Next time I'll try something geometric like lines or grid that will show off the curves.

I checked out a couple library books on machine trapunto.  I had some wash away thread which I bought for basting but hated.  But it worked well for this technique.  I traced some flowers and leaves from the Esther Aliu Hearts Desire pattern with a wash away pen on the yellow - white chalk pencil on the green.  I used a layer of poly batting under this fabric (I used spray basting to hold them together)  and FMQ the outline using wash-away thread on the top and white on the bobbin.

  Then with embroidery scissors, I trimmed the batting close to the stitching lines.

I think this might look better with a denser, high loft poly batting, at least for the flowers....but this is all I had.

I added a layer of cotton batting and a piece of backing fabric.  I also used some applique pins in addition to the spray baste just to make sure everything stayed together.

My basting lines for the batting were very wobbly in places, so I liked this approach as I had a second chance to follow the outline with the real thread layer and improve the shape of anything that looked wonky.

My camera didn't catch the details very well.  I used straight(ish) lines in the green about 1/4" apart which helped make the leaves pop.  I made the lines intentionally wiggly on the yellow sections, but the same distance apart.   I used a varigated yellow to outline the flowers - Next time, I'll stick with a dark gold.  The background thread on the yellow is a pale yellow.

Here's the back.  I used off-white in the bobbin for this whole square as I wanted the back to be all yellow/cream so the final quilt will be dark fall colors on the front and pale spring colors on the back.

And in case you are wondering why my FMQ panels are all pieced, it's because I  had designed a quilt in fall colors that was long strips of green, gold & red and figured out a way to break that into 42 practice panels.   Last night and this morning I  finished cutting out and piecing all the panels using old stash material!

I started FMQ in May 2011 and I'm struggling with a bunch of advanced FMQ designs in my head, with only advanced-beginner skills.

Sunday, February 12, 2012

Papa Woobie

Here's the "Papa Woobie" aka, the yellow silk tie pieces revisited.

This morning I  took the remaining pieces and made a Rail Fence variation in 6" blocks.  That was only about 22" square.   I thought it would be a good baby quilt, but wasn't quite big enough.  When I went to the fabric store to buy Minky, I thought I'd get enough for strips on the front as well as the back.  Unfortunately, the only yellow they had at the chain fabric store was dark gold, not this pale yellow.   I hadn't taken this piece of fabric and didn't realize how very terrible it looked until I got home.  So, plan B was to add 6" strips of mauve silk.

I spent the afternoon quilting this with the walking foot and pale yellow thread.  I continued the random width strips into the outer binding, and I'm shocked about how much I like the yellow stitching on the mauve silk.  The quilt ended up 33" square.

If you haven't been following this step-by-step, each piece of silk has light weight fusible interfacing on all the silk fabric.  I didn't add any batting, so it's just the silk, interfacing & minky backing.  I pre-washed all the silk fabric in cold then air dried.  Then it was ironed on hot with steam, and a spray bottle of water on occasion.  After all the machine quilting was done, I serged the raw edges and threw it into the washing machine on warm/cold with regular detergent, then dried on medium heat in the drier.  This is what it looks like now.  Silk is super tough...I'm not sure why everyone thinks it's destined to undergo terrible dry-cleaning chemicals.

What's with the "Papa Woobie" name?  I was thinking about my brother who donated the ties. He is newly a  Grandpa-by-marriage.  And then I started thinking about my dad, whom my girls referred to as Papa.  He was famous as a "nap coach".  This quilt is so amazingly soft that I think it would have amazing magical properties in making anyone wrapped up in it fall asleep instantly.  It's not quite big enough to be a respectable quilt, but it has passed the Skater Girl Amazing Texture Woobie rating.  This quilt and a good story (yawn) will make anyone (sigh) ready to ...snooooo ooo oo zzzz ZZZZZZ ZZZZZ

Friday, February 10, 2012

Tie Quilt Solved

It isn't everything that I'd hoped for, but it is better than it was.  By pulling the yellows out, I no longer hate it.  The greens show up more in the photo than they do in person, but the blue/yellow I don't like in person disappear here, so I guess it all averages out.

I'm thinking about backing this with minkee, and skipping the batting.  That should make a very soft quilt that shows off the drape and shine of the silk.  I'm now calling it an "Executive Woobie"

Wednesday, February 8, 2012

Tie Quilt Update

Thanks for all your tie quilt suggestions.  My challenge remains that I have used all but very small bits of all the silk ties that I have.  Unlike a traditional cotton quilt, I can't just pull a yard of navy blue out of the stash. And if I'm going to spend money on nice silk, it certainly won't be for a quilt.  

Joanne came to my rescue with some ties from her newly retired hubby's closet.  At first glance these are far more tan than the existing collection.  I may be OK swapping these reds for the yellows in the piano key border.

I stopped by the thrift store on the way home, but I am NOT going to pay $5 each for used silk ties to finish this quilt.  I did cruise the women's blouses though.  For $4 I have a "new" red silk blouse for valentines day.  And a $2.50 purple cotton sheet to back a quilt (it was half-price purple tag day at Savers).

All of this digging through my regular sewing stash for hidden silk has also spurred an old need to work my way through the fabric-for-clothes bins that remain piled in the garage.   Great.  Just what I needed - more UFO's to taunt me.

Sunday, February 5, 2012

Tie Quilt Stalled

It turns out that I had enough grey for the sashing. Hurray!!!

This morning I worked on making a border using the rest of the ties.  Unfortunately, I don't like it.  I think that all the color detracts from the pinwheels.

Problem is that w/o those borders, the quilt is only 45" square.  And I'll need to make a second quilt to use the strips, but it will also have to be small and/or combined with cotton fabric.

Saturday, February 4, 2012

Visible Progress

I've been trying to clear the Living/Sewing Room of projects in preparation for the Super Bowl.

I posted my feathers on green Wed night after I'd finished, but wanted to show it from the back side.  It really isn't as bad as the previous picture suggested.  After a good washing, that cotton batting should make it look down-right wonderful.

When I started this morning, the FMQ foot was still on the machine, so I pulled out one of the crazy patch panels which will go into the Fall Stripe quilt that each of these FMQ practice panels will become.

This is the fill from the back - the heart shape leaves from the FMQ challenge January tutorial with the spiral variation posted on Francis' blog.

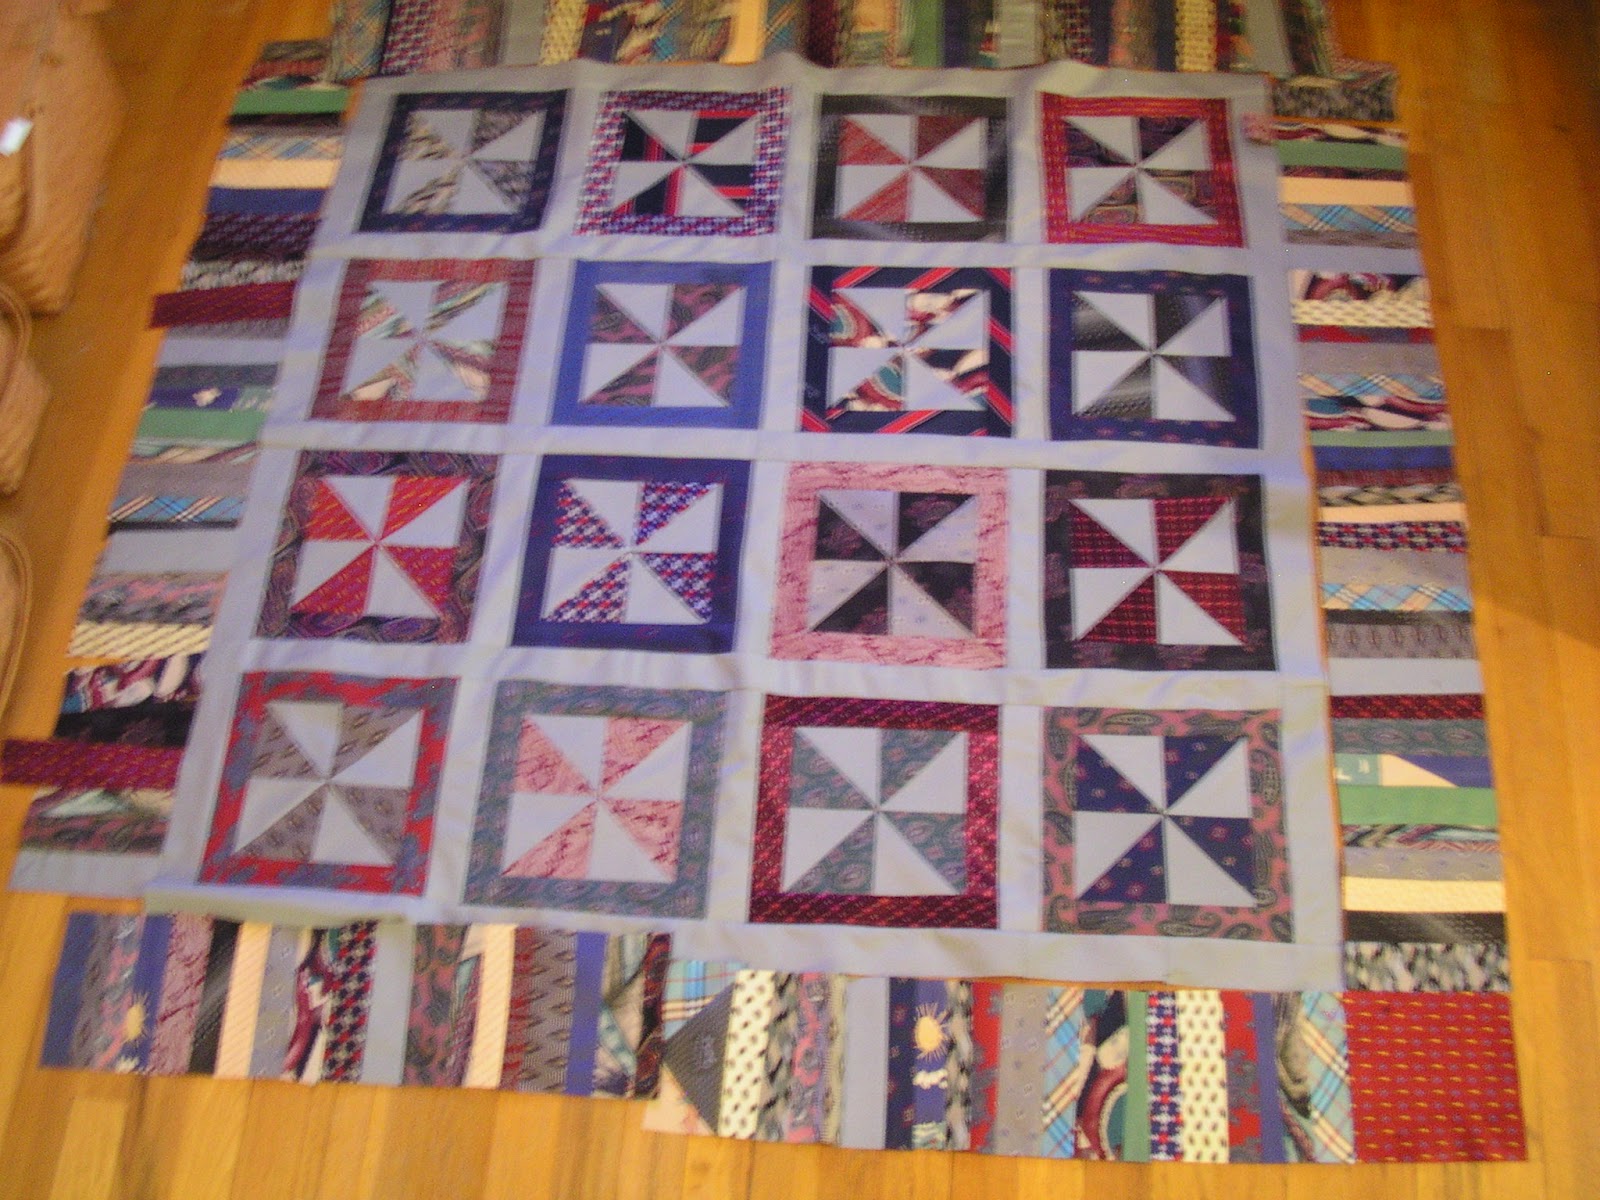
I had made HST blocks for the Silk Tie Quilt earlier, and this morning put the rest of them together into pinwheels.  One trick that I learned from doing very fussy and detailed piecing projects is to press the bejeebers out of it at every step, and TRIM.  Each pinwheel ended up a perfect 7" square.

You remember that I have issues with random and scrap right?  So I had to fuss with the pinwheels to distribute the reds, the abstracts, the paisleys and the geometrics.

I started with the blue ties and added strips.  I forgot to take pictures, but the process was simple.  I trimmed on rough edge of the tie pieces for a straight edge and sewed them to opposing sides of the pinwheel.  The width of the pieces dictated my next decision, which was to trim the outer edges to 1.5" from the sewn edge, which made my final raw-edge square 9.5".  I tried to distribute the blues across the quilt.

Next I did the blue/black/grey.  I was hoping I'd have enough ties to make the frames on all of this section blue, but it didn't work.  So I finished up with some reds. Some of the blues and reds for the frames aren't on the pinwheels b/c the wear marks on the ties kept me from being able to cut a 6" square for the HST.

Now I'm at a decision point.  I want to sash these with grey, but I'm going to have to do some careful math (not my forte) to be sure I have enough to pull it off.   I also want to make a piano-key border for the outside using the scraps from these ties plus the ones I didn't use, which include some yellow and a light pink.  I'm trying to decide b/w cutting them into even width strips, or try to match up the existing angles from the tie pieces for a slightly wonky strip.  I also need to decide if this quilt is going to be square or rectangular.  I can make it rectangular by making the stripped pieces 6" on 2 sides and maybe 2" on the others?  Think I'll have a glass of wine and wait for inspiration.


Wednesday, February 1, 2012

Hard Week

For some reason, everything this week has turned out to be harder than it needed to be.    For example, both my work places are implementing new computer software this week.  When I was running errands, every time I tried to pull into a parking space, there was a pedestrian ambling in my way and just when I thought I could pull in, they would do something stupid like open a car door into the space or stop walking gaze the opposite direction.  And my cell carrier would give me an employee discount...but I had to print a paystub which it turns out I could only access at work (it was my day off) and my husband had to come with me to approve changing the account into my name.

In keeping with the undesireable theme of my week, I decided to do the FMQ challenge block tonight when I got home, because I'm tired and I never have been good at feathers.  Why start doing things the easy way now?   Just for good measure, I used strongly contrasting thread so everyone could see how bad things really look.

What I liked:  The idea of varying the feather size along the same stem and the multi-branching feather ideas.  Drawing it out with pencil first gave me confidence, even though I don't believe I actually followed any of the lines.

What I don't like:  The small space I have for my fingers on my traditional machine makes it difficult to make smooth curves especially on bigger petals.  For some reason, I found it harder to leave space b/w petals than to backtrack. Even echo was very hard for me tonight especially on the outer edges.  I also found it very challenging to make the petals from the bottom point upward to the center divot since that is the exact opposite directions in which I normally draw hearts.

So, that's it.  My feather attempt for now.  Maybe I'll try again after I've logged another dozen hours of FMQ and I've spent time in staff meetings doodling feather designs on my notes.