Thursday, March 31, 2011

Cat Parts

I hope you don't have a weak stomach...as I intend to show dis-imbodied cat parts.  Here's the cat face.  Ears and whiskers will be added later.

And here's a cat-tail, with some misc spots.

So here's the great irony...I really, really dislike the whole process of freezer paper applique....

But it occurred to me that I had this fancy-smancy circle cutter that I bought for scrapbooking and pretty much never use.  Turns out that it works better on freezer paper than it ever did on scrapbook paper.  Also, it messed up on smaller diameter circles, but not ones that were 2 inches or larger.

The next challenge on the project is making the cat body.

However...it was 68 degrees and sunny this afternoon.  So when Harley Dude got off work at 2:00, we hopped on the bike and headed North.  I can honestly say that I was half-way to Crouch before I realized that it wasn't Sunday (the day we usually ride) and that Stich & Snip would be open.

(I snapped this just as he was saying "When should I start to worry that you haven't shown up")

After I was dropped off, I managed to purchase these lovelies before I walked back down the hill to the bar.

(As I walked through the restaurant side, an employee I'd never seen before said "He's on the back patio"  and 20 steps further the unfamiliar bar-keep said..."You must be the wife...what would you like to drink?"  Like I'm the only biker chick in town...oh wait, I was today.)

Ok.  Maybe I bought these too.

Tragically, I found out while I was there that the Treasure Valley Shop Hop theme this year is Batiks.  It starts April 7th.  Who's driving to Baker & Halfway, Oregon with me?

Wednesday, March 30, 2011

Wabi-Sabi


I have been in love with Hiromi's brilliant purse designs that she sells under the label of Harujion Design.

She just posted about this very cool event that she is doing in South Bend, IN to upcycle your favorite fabrics into amazing purses.  How cool is this?  It is probably a good thing that I live so far away.   What's your excuse?
I am anxiously awaiting my Hiromi dragonfly purse.  Harley Dude shelled out some herns (hard earned dollars) for a custom purse for my birthday (in June) made out of these wonderful fabrics.

I've seen the design sketches...but y'all will have to wait for the final product!

Wednesday

Last night, after I'd blogged on Love Entwined, I was feeling like I was ready to let that project become an UFO.  I both love and hate the "mystery" aspect and I dread doing the same basic pattern 4 times.

So I pulled out Rita's hexi quilt that I've been ignoring for months.  I replaced 8 hexies that were the wrong color before I lost interest in that as well.

This morning, I decided to get started on the Charley Harper Challenge quilt.  I was pretty enthused about this until I realized that the 64" x64" format I'd planned was going to make those leaves 8" x 13".  And I'd already decided that I was going to make most of the leaves 3-D.  Which means the leaves will have to be quilted before they are added to the quilt.

So I did some color assignments on tissue paper of the 4 variations of green that I bought for the leaves.

I must point out that my frugality makes this project more difficult than it needs to be.  I started by splicing together those odd-shaped pieces of batting to use in the gigantic leaves.

Had I not been so cheap, I could have traced all the leaf shapes onto my light background piece, then layered the light and dark leaf fabrics (right sides together) and the batting...and just stitched away. But as my friends and I used to say in high school "We Super-heroes do everything the hard way."
I made a leaf template from a cereal box and used it to identify where the leaf would be cut out of my random batting scrap.

Then by feeling through the fabric to the cardboard template, I was able to arrange the other 2 fabrics (right sides together) on top of the template & batting and drew the sewing line on the background fabric.

Since I was placing the leaves 1/2" apart from each other, I found it was easiest to trim the batting to 1/4" before I lined up the next random scrap of batting.  I proceeded on this way using up scraps of both the light green background and the batting.

Once they were all sewn, I cut out all 3 layers with a 1/4" seam allowance, trimmed of the tips and snipped the curved edges.  I made a 3" slit in the back of the leaf  (where the center stem line will be), turned them inside out and pressed.

I wanted them to have the same kind of modern vibe as the original, so instead of traditional leaf veining, I sewed co-centric ovals shapes with a line down the center.

Time for me to get back to work....just wanted to post early enough that my UK friends could be impressed with my progress before they headed to bed.

(Editorial note...my cat is more brown than the CH Calico...and the bird is not scheduled to appear on the final quilt.)

Tuesday, March 29, 2011

Love Entwined

I got this block nearly finished Monday while the window guys were banging on my nerves.  Just a couple hearts today for the finish.  I am still debating on the "slits" in the hearts.    Esther's "Stories Behind the Blocks" post from the Yahoo Group says "The pierced hearts that join together to flower in collects of 4 go on to unify the blocks. As with traditional folk motifs, a hole in the heart represents hardship, pain or difficulty. And of course, all beauty and longing, desire and harmony is momentary, just as life is."  As I was working on this yesterday, I felt like I needed to leave only a 1/4" edge around the hearts, and leave the rest as a large gaping hole.  But maybe by the time I get the blocks all finished, there will be some healing.  

Monday, March 28, 2011

New Light Box

Window guys installing my new 92" x 52" pattern tracing light box.
I am so pleased with the new windows that I will try to pretend they didn't stomp down all my spring plants in 2 flower beds.  Look!!! The grass is green in March.  Hello Spring!

Sunday, March 27, 2011

Half an Orange Popsicle

I made it half-way through the orange popsicle today before I had to put everything away.  The window guys are coming in the morning to replace the 3 windows in the living room (where I do all my sewing) and the 3 in our bedroom (where we seem to stash everything when company is coming).  I hope to get back to this project later in the week.  Meanwhile...it'll be small, contained handwork for a couple days.

If you've stopped by from the Lily's Quilts Fresh Sewing Day...I hope you'll take the time to check the 4 posts prior to this that went through the 3 day's of progress from this round of efforts.  M.

Saturday, March 26, 2011

The Merlot Experiment

Yeah, sure...I could go buy some dye.  But I really wanted to know if the Merlot that stains my favorite clothing might have a beneficial effect on my quilt.

Turns out that after heating with the iron, Merlot turns rather brown.... but still the effect I was going for (click to enlarge).  Still plan to add shadowing, etc with quilt stitches, so not overwhelmed with the need to make exactly right now.

Here's a section from the right side.  It exemplifies my mixed need for detail and abstract.  I hand appliqued the stool top, but used a great batik for section to it's right.

Popsicles Details

This is the morning's progress.

I am finding that I am pulled between a desire to add interesting detail, and the logic to take advantage of the batik to add variation.   I also realized that of the 3 prints that I have of the painting, some lack detail and others were cropped.  I didn't realize until late this morning that the blob in my pattern on the left corner was a pirate.  Getting the red staining to match up b/w the different fabrics has also been a challenge.  This is actually the 3rd version of the right side of this section.

I was going to leave out the square with the writing....but I have decided to embroider secret meaning into all the places where there is text in the cartoon.  This square will have a secret message to my daughters.  (The bottom speech bubble will have the quilt name, date & signature.  The right bubble has a secret message for the artist.)

I need to move away from the detail and on to the big section in the interest of space and time.  My living room looks like a fabric store barfed all over it.

Friday, March 25, 2011

Friday Progress Report


I didn't actually accomplish as much as I had set out to do.  I did get the lower left corner of the popsicle quilt pieced together and added the next sectio b/w the popsicle and the stick.  But then my cat thought it would be a good idea to coach me through a nap.  How could I turn down a fuzzy nap partner?

Harley Dude offered to take me out for lunch.  How could I possibly say no?  But when I returned, I was totally out of the mood to crawl around on the floor working on the popsicles...So I started working on some flower buds, using back-basting technique.

Tomorrow is going to be rainy...perhaps I'll get more done.

Thursday, March 24, 2011

Wooo Hoooo!

I was just released from jury service which means that my Spring Break Stay-cation starts a day early!

I've finished the vines for Love Entwined and am ready for some leaves & flowers.  Although I used bias strips for most of the vines, the bottom vine that forks into 3 for the flowers, I did as back basting rather than fuss with all the short stems.

Bright and early Friday morning, "Momsicles Popsicles" gets pulled out of it's hiding place and is my sole purpose in life for the next 3 days.  This is one of those projects that ends up spread across 3 rooms while I work on it, and requires a chunk of time without distractions in order to make progress.

I actually have a good bit of that orange popsicle pieced (after I took this photo), so my progress should look impressive.


Check out Terrece Beesley's website!  She's the artist who gave me permission to reproduce this great watercolor painting!  Her prints (as well as the original Momsicles Popsicles) are available at this link.

I hope to be able to make some daily progress posts over the next week!  Hope y'all don't get too tired of me!

Tuesday, March 22, 2011

Heart's Desire - Bias strips

Esther has launched both the Sing Me a Song block, and Love Entwined.    I decided to start with Love Entwined, since there are 3 needed...and I get bored doing the same thing over.

I used a different technique than what others are talking about on the Yahoo Group.  The way I learned to do bias strips is a bit different.  I made 1.25" bias strips for the wider circle (finishing at 3/8") and 1" bias for the narrow stems (finishing at 1/4").
Press in half with raw edges matching on one side, and right sides out.

  Since my original plan was to use back basting, I had drawn the design on the back side of the background fabric.  I basted the OUTSIDE line of the curve in black. (If you marked on the front side, just use your drawing line as a guide)   Then I stitched the bias strip an 1/8" from the raw edges on the inside curve.

I just eye-balled it so my stitching line is 1/2 way between the upper-curve-basting-line (which may be your drawn line)  and the folded edge of my bias strip.  Make sure this side of the bias isn't pulled tightly or you'll get a lot of puckering on the background fabric.

Flip the bias strip out and stitch down on the outside curve.  Since I'm using scraps, I had short pieces of bias.  I sewed the ends down and and trimmed them at a location that will be covered by another stem.

Since there's a mix of "over" and "under stems, I did my best to work from the background out.  This stem used the same process as the circle.

After the "outer" curve was stitched, I trimmed the right side of the stem to 1/2 distance it'll be under the dark circle stem.  I snipped a couple of the stitches on the inner curve, tucked the stem in and stitched the circle back in place.

I hope to finish the stems tonight and move on to leaves tomorrow.

Wednesday, March 16, 2011

New Fabric

I've been very good for a very long time.  But today I broke down and bought these wonderful fabrics for a certain calico cat.  Brownish-black for the branches, 4 greens for the leaves, the dotted black & selection of oranges for the cat.  A little fabric therapy :)
I'm also feeling quite smug about my blind color matching.  The fabrics on the left are what I bought on my way home from work to match the fabric on the right that I just pulled out of a box in the garage where I stashed it 6 months ago.

Tuesday, March 15, 2011

Color Test

W. C. Fields was right. Stupid Cat.
I had this great post with a series of photos that showed my dubious progress of selecting fabric, when Marley decided to walk on the keyboard and in a single paw swipe it was GONE.   The less brilliant version goes like this:

Cold, wet cat who hates to sit in your lap unless she's thinks you look warm and absorbent, helps herself to my lap.  I toss orange fabric on her for a color test.

Once the correct camera settings are established, the fabric looks too orange.
So I set about trying to take photos of her next to terra-cotta.  This is as good as it gets.  No modeling contract in her future.

So...Calico Cat Butlers....since I'm trying to use fabric from the stash....do I go with the orange (of which I don't think I have enough) or the terra-cotta that's under the paw?

Monday, March 14, 2011

Cat Planning

limb on a limb
I've been out of the blog loop for a while dealing with a double tragedy at our house.  My husband's best friend has gone missing while driving across the state (270 miles) on rural road to our town for a business meeting then to hang out with us.  While the searching was going on, my husband's cousin and his girlfriend died in a plane crash.  All 3 are from the small town of Rexburg, ID.  It certainly doesn't compare in scope to the tragedies in Japan, but is much more personally devastating and emotionally draining.

Last night when I was told to "step away from the computer" I was able to report that I was, in fact, surfing quilt-porn.  This is the term used at our house for blogs.  DH listens to Blah-Blah (talk radio). I spent some time graphing out the cat design for the Charley Harper Quilt Along and am currently looking at making a 64" x 64" quilt.  That'll make the cat's face about 8" across, with the tail 5.25" wide and arms 4.5" wide.

Saturday, March 5, 2011

Charley Harper Quilt Along

 
I can't wait!!!  Ethne at Flaming Stitches is hosting a challenge / quilt along to use one of Charley Harper's images in a quilt.  I'm in love with this one:
limb on a limb
Check out the blog and join us!

Wednesday, March 2, 2011

Back Basting Applique - Insides, Outsides & Other Fussy Stitching

I've had some requests to do a tutorial on inside and outside corners.  I don't have anything currently in process, so here are some pictures from the archive. (When will I ever learn to get a manicure BEFORE taking pictures of my hands? Sheesh!)

OUTSIDE POINTS
Stitch up to 1/4" on one side of the point.  The spot where you stop stitching will be the tip your point.  Make a couple extra stitches in place, or close together here.  Trim off any "dog ears" to reduce bulk.

Put your needle into the point of the fabric.

With a sweeping motion, tuck that point all the way back to the stitched section.  Hold it in place with your  thumb.

Use your needle to tuck the seam allowance under on the left side of the point.  Like any seam using needle turn, just use the tip of your needle to stuff under any extra, pull a little out, or to get the fabric underneath to lay flat.  When you're done fussing, make several stitches close together on the left side of the point then continue on stitching the piece.


INSIDE CORNERS

Make a snip as long as your seam allowance (1/8" if you usually tuck under 1/8", 5mm for 5mm, etc), and and evenly splitting the angle your are turning.  In this example it's a 90 degree angle so it'll be a 45 degree snip.  You may need to make this snip a bit longer, but it's easier to do that than regret you went too deep.  Normally, I wait to snip until I've stitched up to  an inch from the inside point.

I was missing photos of the next steps, so here's a mock up using contrasting thread.  You can see in this photo that the snip wasn't long enough because instead of being a 45 degree angle, it turns up at the corner.
But by making the snip just a LITTLE longer, the edge stays nice and straight to the corner.  As I approach the corner, I make my stitches closer together, then 2-3 right at the inside angle.

Then just turn the corner, flip the seam allowance under, using your needle to fuss with the fabric to make the angle look straight.  Then stitch away from the corner.


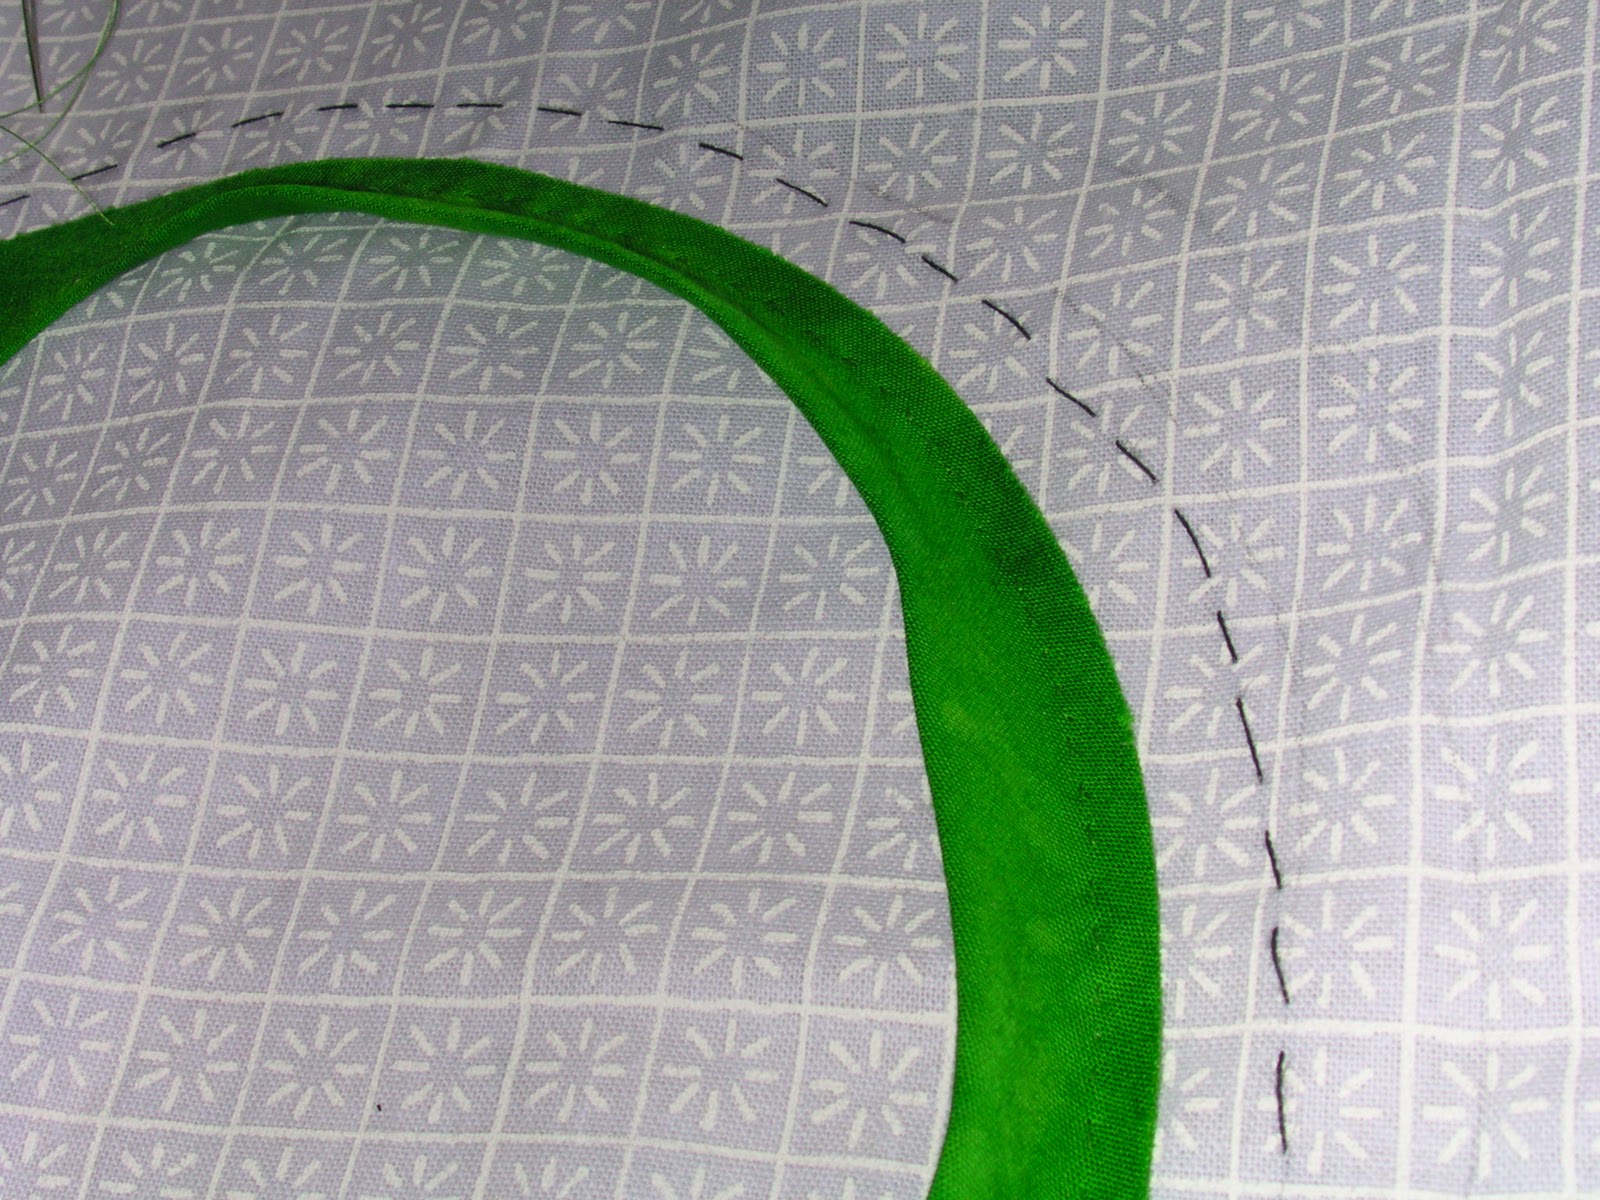
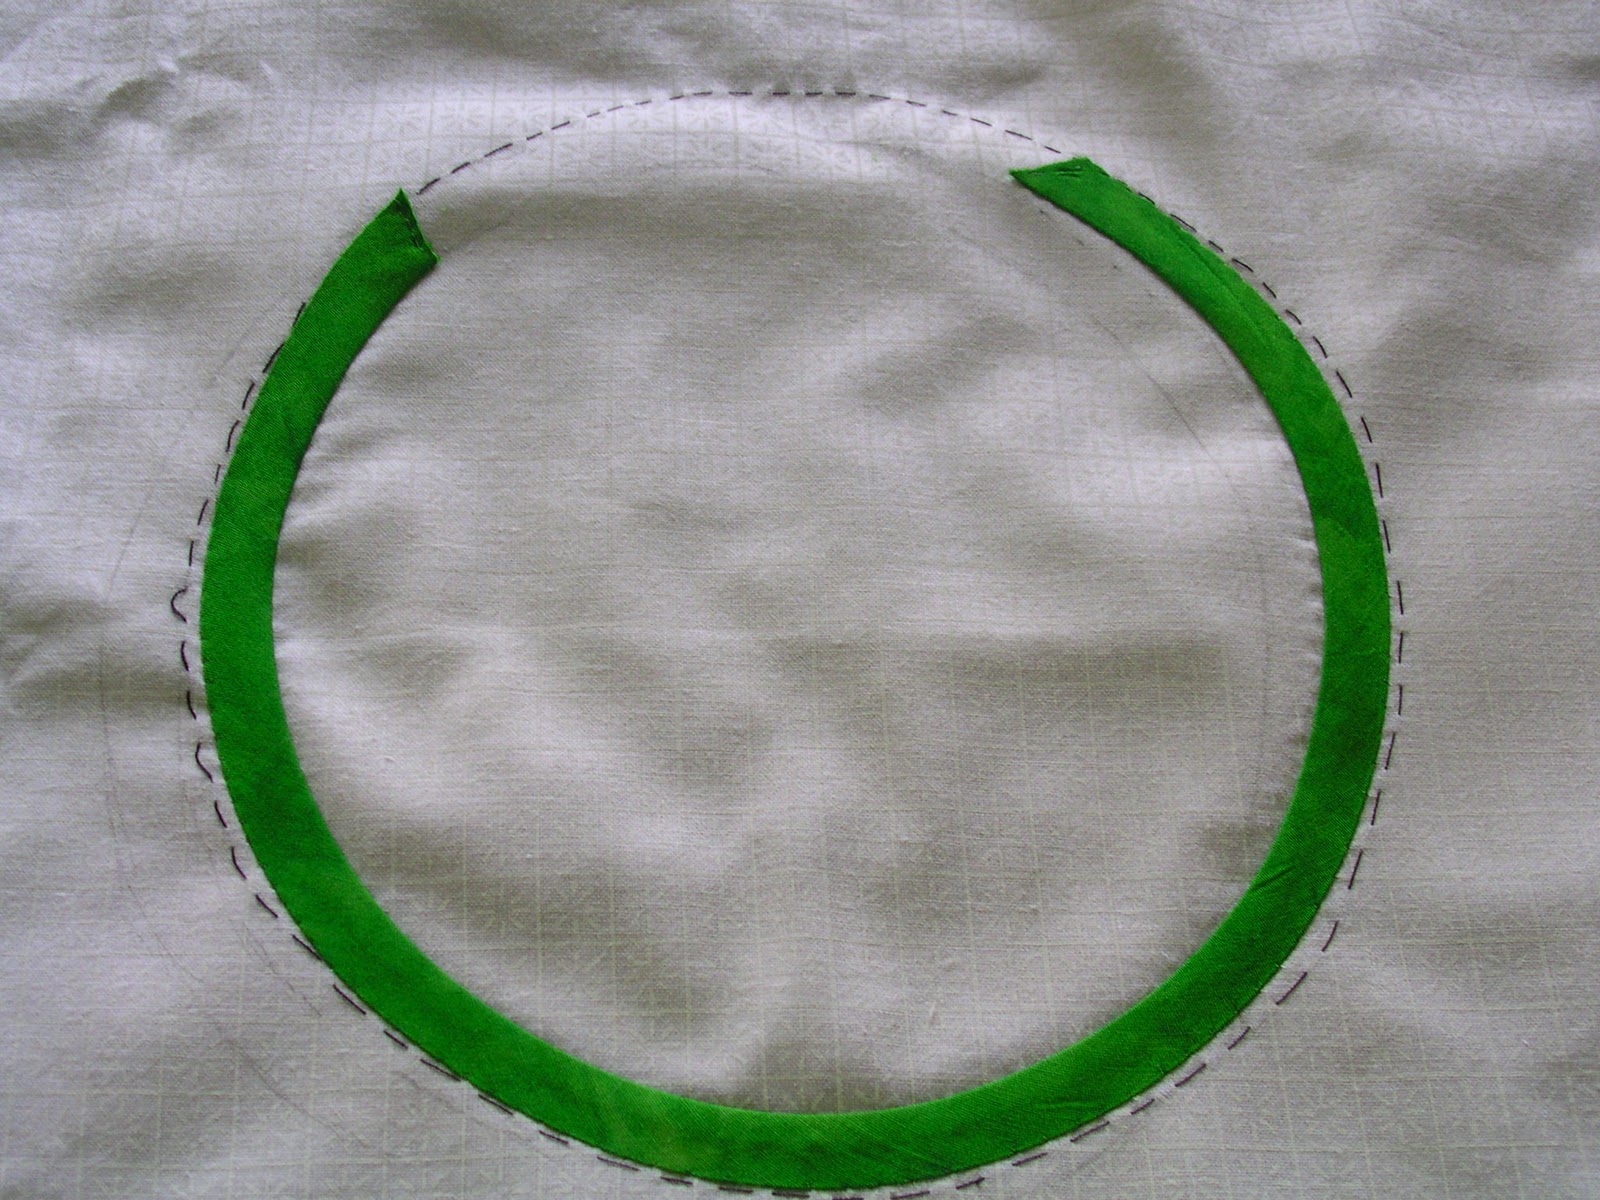
For a tight outside curve, I use the needle to turn under the entire curve before stitching anything. My thumb holds the fabric in place while I tuck and pull a tiny bit at a time until I'm happy with the smoothness of the curve.  (Aren't opposable thumbs a grand invention?)

Let me know if things aren't clear and I'll edit accordingly.